07.07 控件-RadioButton
JiangMing 2022/3/27 Android 开发基础
# 基本介绍
RadioButton 单选按钮,可让用户从一系列选项中选择一个选项。对于可选项相互排斥的情况,用户需要并排看到所有可用选项,则可以使用单选按钮来实现。

要创建各个单选按钮选项,可以在布局中创建 RadioButton。 不过,由于单选按钮选项是互斥的,因此必须将它们聚集到 RadioGroup 内。将它们聚集为一组后,系统就可以确保一次只选择一个单选按钮。
关键类如下:
特别注意:
要为 RadioGroup 中的每个 RadioButton 添加一个 id,不然单选功能会生效。
RadioGroup 是 LinearLayout 的默认为垂直方向的子类,可以通过 android:orientation来指定方向。
# 响应事件和状态获取
响应单选按钮的点击选中事件和获取其选中状态,一般有三种方式:
- 通过
RadioGroup.setOnCheckedChangeListener监听事件。 - 给每一个
RadioButton设置一个android:onClick属性添加到 XML 布局中的<RadioButton>元素中。此属性的值必须是为了响应点击事件而调用的方法的名称。随后,对应布局的Activity必须实现相应的方法。 - 获取状态值可以通过遍历
RadioGroup中RadioButton的isChecked()方法来获取选中的值方式。
RadioGroup 中常用的方法:
getChildCount():获得按钮组中的单选按钮的数量getChildAt(int index):根据索引值获取我们的单选按钮getCheckedRadioButtonId():获取单选组的选中按钮的id
# 使用示例
xml布局:
<?xml version="1.0" encoding="utf-8"?>
<LinearLayout xmlns:android="http://schemas.android.com/apk/res/android"
    android:layout_width="match_parent"
    android:layout_height="match_parent"
    android:gravity="center"
    android:orientation="vertical">
    <!-- 单选组1 -->
    <RadioGroup
        android:id="@+id/rg_demo1"
        android:layout_width="match_parent"
        android:layout_height="wrap_content"
        android:background="#8BC34A"
        android:gravity="center"
        android:orientation="horizontal">

        <RadioButton
            android:id="@+id/rb_1"
            android:layout_width="wrap_content"
            android:layout_height="wrap_content"
            android:checked="true"
            android:text="选项1-1" />

        <RadioButton
            android:id="@+id/rb_2"
            android:layout_width="wrap_content"
            android:layout_height="wrap_content"
            android:text="选项1-2" />

        <RadioButton
            android:id="@+id/rb_3"
            android:layout_width="wrap_content"
            android:layout_height="wrap_content"
            android:text="选项1-3" />
    </RadioGroup>

    <!-- 单选组2 -->
    <!-- Activity中需要实现onRadioButtonClicked方法响应事件 -->
    <RadioGroup
        android:id="@+id/rg_demo2"
        android:layout_width="match_parent"
        android:layout_height="wrap_content"
        android:background="#00BCD4"
        android:gravity="center"
        android:orientation="vertical">

        <RadioButton
            android:id="@+id/rb_4"
            android:layout_width="wrap_content"
            android:layout_height="wrap_content"
            android:onClick="onRadioButtonClicked"
            android:text="选项2-1" />

        <RadioButton
            android:id="@+id/rb_5"
            android:layout_width="wrap_content"
            android:layout_height="wrap_content"
            android:checked="true"
            android:onClick="onRadioButtonClicked"
            android:text="选项2-2" />

        <RadioButton
            android:id="@+id/rb_6"
            android:layout_width="wrap_content"
            android:layout_height="wrap_content"
            android:onClick="onRadioButtonClicked"
            android:text="选项2-3" />
    </RadioGroup>

    <!-- 单选组3 -->
    <RadioGroup
        android:id="@+id/rg_demo3"
        android:layout_width="match_parent"
        android:layout_height="wrap_content"
        android:background="#FFC107"
        android:gravity="center"
        android:orientation="horizontal">

        <RadioButton
            android:id="@+id/rb_7"
            android:layout_width="wrap_content"
            android:layout_height="wrap_content"
            android:text="选项3-1" />

        <RadioButton
            android:id="@+id/rb_8"
            android:layout_width="wrap_content"
            android:layout_height="wrap_content"
            android:text="选项3-2" />

        <RadioButton
            android:id="@+id/rb_9"
            android:layout_width="wrap_content"
            android:layout_height="wrap_content"
            android:checked="true"
            android:text="选项3-3" />
    </RadioGroup>

    <Button
        android:id="@+id/btn_rg_demo3"
        android:layout_width="wrap_content"
        android:layout_height="wrap_content"
        android:layout_marginTop="10dp"
        android:text="获取单选组3的选中项" />

</LinearLayout>
示例代码:
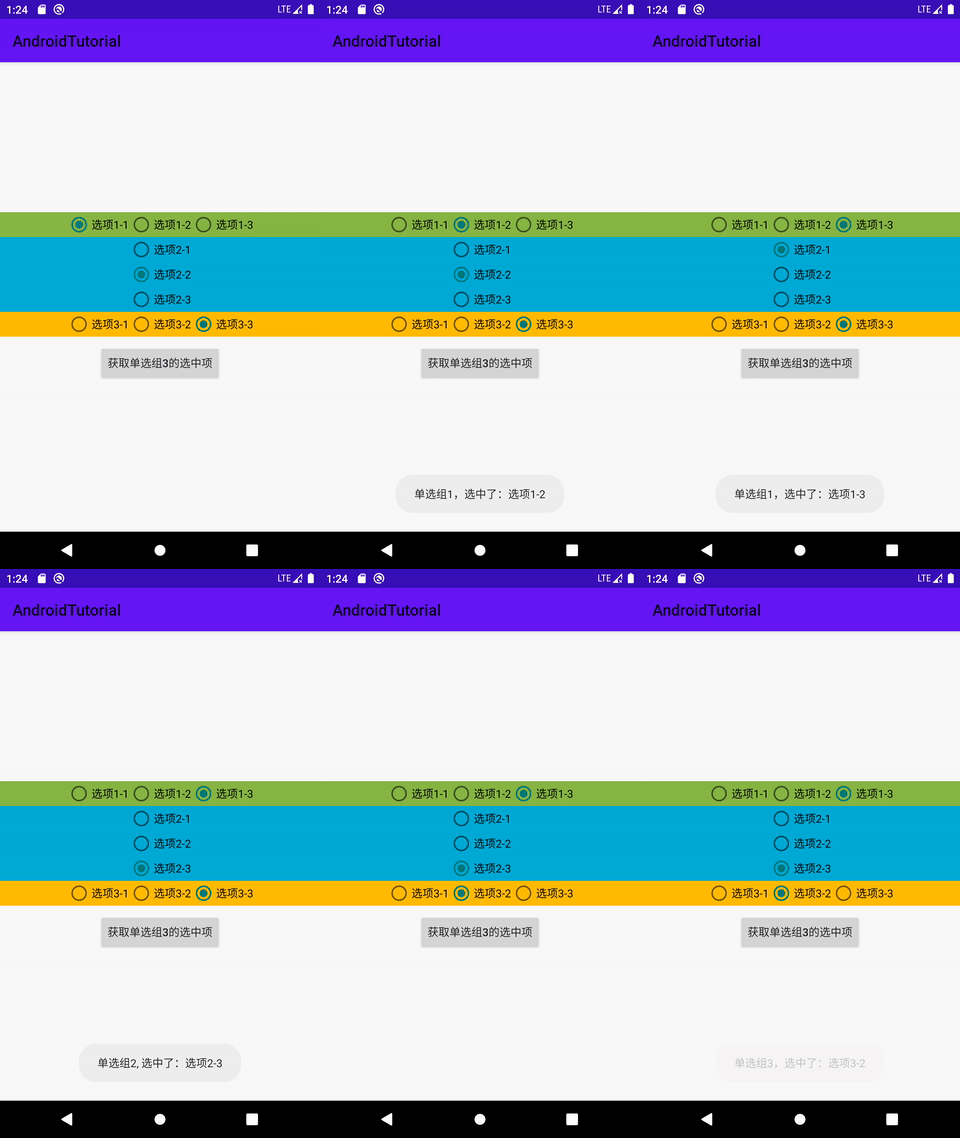
// Demo1:通过OnCheckedChangeListener监听选中事件变化
RadioGroup rgDemo1 = findViewById(R.id.rg_demo1);
rgDemo1.setOnCheckedChangeListener(new RadioGroup.OnCheckedChangeListener() {
    @Override
    public void onCheckedChanged(RadioGroup group, int checkedId) {
        RadioButton rbChecked = findViewById(checkedId);
        Toast.makeText(DemoActivity.this,
                       "单选组1,选中了:" + rbChecked.getText(),
                       Toast.LENGTH_SHORT).show();
    }
});

/**
* Demo2:通过指定onClick属性指定事件处理方法onRadioButtonClicked,监听选中状态变化.
*
* @param view 操作的单选按钮对象
*/
public void onRadioButtonClicked(View view) {
    RadioButton rbChecked = (RadioButton) view;
    Toast.makeText(DemoActivity.this,
                   "单选组2, 选中了:" + rbChecked.getText(),
                   Toast.LENGTH_SHORT).show();
}

// Demo3: 通过其他按钮主动遍历获取单选组的选中状态
RadioGroup rgDemo3 = findViewById(R.id.rg_demo3);
// 获取单选组中选中状态按钮的id
int checkedRadioButtonId = rgDemo3.getCheckedRadioButtonId();
// 通过id获取到选中状态的按钮
RadioButton rbChecked = findViewById(checkedRadioButtonId);
// 通过按钮点击,主动遍历获取按钮的选中状态
Button btnDemo3 = findViewById(R.id.btn_rg_demo3);
btnDemo3.setOnClickListener(new View.OnClickListener() {
    @Override
    public void onClick(View v) {
        // 获取单选组中的单选按钮数量
        int childCount = rgDemo3.getChildCount();
        for (int i = 0; i < childCount; i++) {
            // 获取对应的单选按钮
            RadioButton rb = (RadioButton) rgDemo3.getChildAt(i);
            // 获取单选按钮的选中状态
            boolean checked = rb.isChecked();
            if (checked) {
                // 选中状态的按钮
                Toast.makeText(DemoActivity.this,
                               "单选组3,选中了:" + rb.getText(),
                               Toast.LENGTH_SHORT).show();
            } else {
                // 非选中的按钮
            }
        }
    }
});
效果:

提示:
- 在
android:onClick属性中声明的方法必须满足以下条件:
- 公开
- 返回 void
- 将
View指定为其唯一的参数(这将是被点击的View)
- 如果需要自行更改单选按钮状态,请使用
setChecked(boolean)或toggle()方法。
# 自定义选择框样式
默认的单选控件的单选框样式是可以通过自定义 drawable 文件的方式来实现自定义样式实现的。
通过 android:button 属性指定自定义的 drawable 来实现图标样式的替换。
# 修改文字与选择框的距离
- 在XML代码中控制: 使用android:paddingXxx = "xxx" 属性来控制距离。
- 在Java代码中设置:paddingXxx(默认一般是paddingLeft)。
# 文字与选择框的相对位置
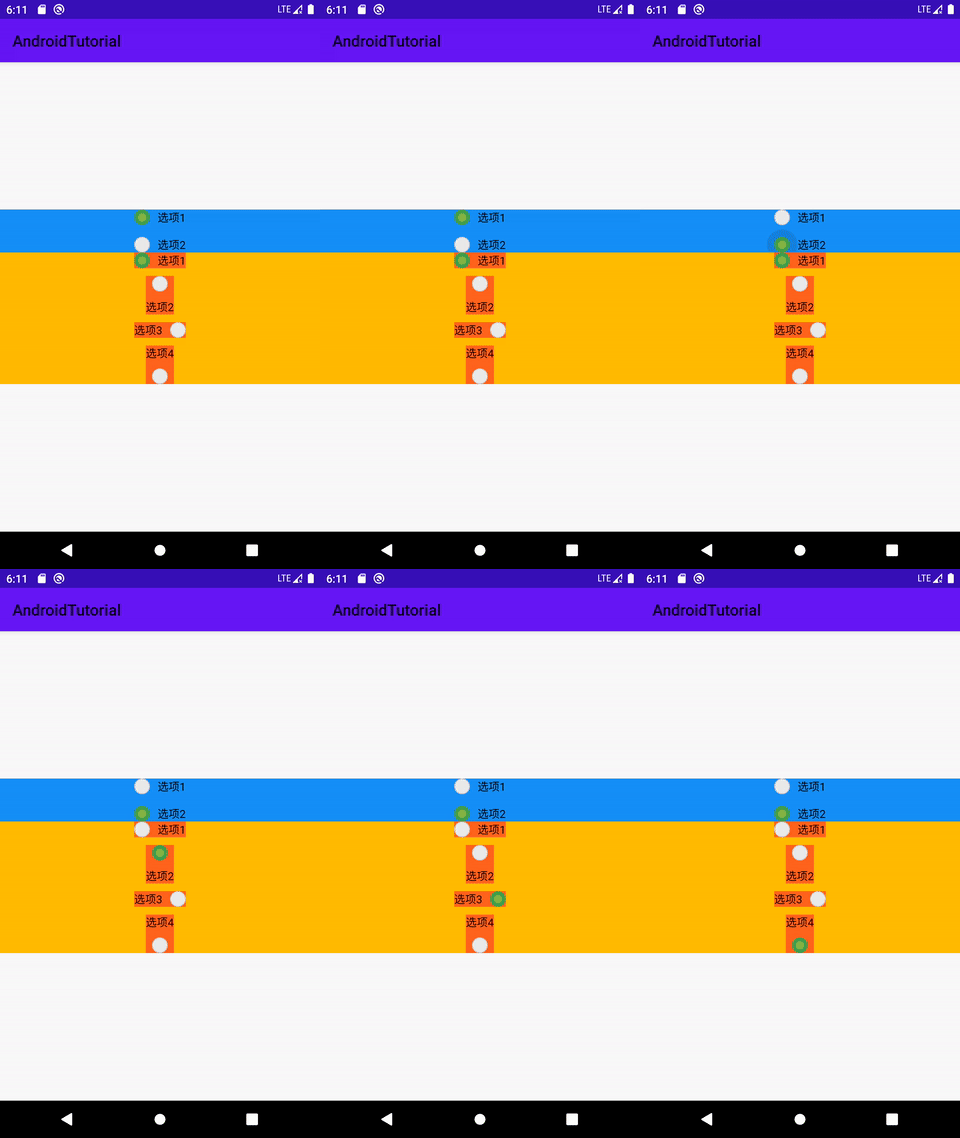
默认情况下,选择框在左边位置,文字在右边位置,如果想要自定义一个位置的单选按钮,可以:
- 设置:
android:button="@null" - 设置图标位置和资源:
android:drawableXxx="@android:drawable/xxx"
# 自定义样式示例
自定义样式的 Drawable 文件:
- 定义开和关的形状,在drawable文件夹中创建文件,通过drawable 资源文件的方式定义。
shape_thumb_on.xml:
<?xml version="1.0" encoding="utf-8"?>
<!-- 选中状态样式 -->
<shape xmlns:android="http://schemas.android.com/apk/res/android"
    android:shape="oval"> <!-- 圆形 -->
    <!-- 宽高大小 -->
    <size android:width="20dp" android:height="20dp" />
    <!-- 填充颜色 -->
    <solid android:color="#8BC34A" />
    <!-- 描边大小和颜色 -->
    <stroke android:width="5dp" android:color="#4CAF50" />
</shape>
shape_thumb_off.xml:
<?xml version="1.0" encoding="utf-8"?>
<!-- 非选中状态样式 -->
<shape xmlns:android="http://schemas.android.com/apk/res/android"
    android:shape="oval"> <!-- 圆形 -->
    <!-- 宽高大小 -->
    <size android:width="20dp" android:height="20dp" />
    <!-- 填充颜色 -->
    <solid android:color="#EDECEC" />
     <!-- 描边大小和颜色 -->
    <stroke android:width="1dp" android:color="#CCC" />
</shape>
selector_radio_button.xml:
<?xml version="1.0" encoding="utf-8"?>
<!-- 状态资源选择器 -->
<selector xmlns:android="http://schemas.android.com/apk/res/android">
    <!-- 选中状态(开关开启状态) 对应的资源-->
    <item android:state_checked="true" android:drawable="@drawable/shape_thumb_on" />
    <!-- 选中状态(开关关闭状态) 对应的资源-->
    <item android:state_checked="false" android:drawable="@drawable/shape_thumb_off" />
</selector>
xml布局:
<?xml version="1.0" encoding="utf-8"?>
<LinearLayout xmlns:android="http://schemas.android.com/apk/res/android"
    android:layout_width="match_parent"
    android:layout_height="match_parent"
    android:gravity="center"
    android:orientation="vertical">

    <!-- 自定义样式单选按钮框 -->
    <RadioGroup
        android:layout_width="match_parent"
        android:layout_height="wrap_content"
        android:background="#2196F3"
        android:gravity="center"
        android:orientation="vertical">

        <!-- paddingLeft:可以调整选择图标和文字的间隔距离 -->
        <RadioButton
            android:id="@+id/rb1"
            android:layout_width="wrap_content"
            android:layout_height="wrap_content"
            android:button="@drawable/selector_radio_button"
            android:checked="true"
            android:paddingLeft="10dp"
            android:text="选项1" />

        <RadioButton
            android:id="@+id/rb2"
            android:layout_width="wrap_content"
            android:layout_height="wrap_content"
            android:layout_marginTop="15dp"
            android:button="@drawable/selector_radio_button"
            android:paddingLeft="10dp"
            android:text="选项2" />
    </RadioGroup>

    <!-- 自定义位置样式单选按钮 -->
    <RadioGroup
        android:layout_width="match_parent"
        android:layout_height="wrap_content"
        android:background="#FFC107"
        android:gravity="center"
        android:orientation="vertical">

        <!-- drawablePadding:图标和文字的间距 -->
        <!-- drawableLeft: 指定图标位置左侧 -->
        <RadioButton
            android:id="@+id/rb3"
            android:layout_width="wrap_content"
            android:layout_height="wrap_content"
            android:background="#FF5722"
            android:button="@null"
            android:checked="true"
            android:drawableLeft="@drawable/selector_radio_button"
            android:drawablePadding="10dp"
            android:text="选项1" />

        <!-- drawableTop: 指定图标位置在上方 -->
        <RadioButton
            android:id="@+id/rb4"
            android:layout_width="wrap_content"
            android:layout_height="wrap_content"
            android:layout_marginTop="10dp"
            android:background="#FF5722"
            android:button="@null"
            android:drawableTop="@drawable/selector_radio_button"
            android:drawablePadding="10dp"
            android:text="选项2" />

        <!-- drawableRight: 指定图标位置在右侧 -->
        <RadioButton
            android:id="@+id/rb5"
            android:layout_width="wrap_content"
            android:layout_height="wrap_content"
            android:layout_marginTop="10dp"
            android:background="#FF5722"
            android:button="@null"
            android:drawableRight="@drawable/selector_radio_button"
            android:drawablePadding="10dp"
            android:text="选项3" />

        <!-- drawableBottom: 指定图标位置在下方 -->
        <RadioButton
            android:id="@+id/rb6"
            android:layout_width="wrap_content"
            android:layout_height="wrap_content"
            android:layout_marginTop="10dp"
            android:background="#FF5722"
            android:button="@null"
            android:drawableBottom="@drawable/selector_radio_button"
            android:drawablePadding="10dp"
            android:text="选项4" />

    </RadioGroup>

</LinearLayout>
效果:

# 结束
本节介绍了单选按钮的基本属性和相关使用方法,如需了解更多,请参考:RadioButton (opens new window)。